Archive
Unified Boxes, The Sum of all fears
Correction: By mistake I included SQL in the supportability statement, apparently I was was speaking about the stack as hall including backup, sorry for that.
Hi there, earlier this week, fellow MVP Michel Di Rooij published a blog post http://eightwone.com/2014/07/02/exchange-and-nfs-a-rollup/ speaking about NFS/Exchange support “Again”, the post motivated me to delve into the pool and add my experience.
The were some hesitation in the MVP community about if we should blog/speak about it or not, Michel was so brave to jump and speak about the topic, and after exchange some emails, we (including Fellow MVP Dave Stork) agreed that this blog is critical and we created it.
IF you want to read more, check Tony Redmond’s article http://windowsitpro.com/blog/raging-debate-around-lack-nfs-support-exchange
So, from where the story begins ???!!!
I am currently working for a major data center provider. In my current role we try to find new ways, innovate and find new technologies that will save us time, effort and money and my team was working on investigating the unified boxes option.
But before delving into the technical part, let me give you a brief background from where I am coming, my position as an architect in a service provide is an awkward position, I am a customer, partner and a service provide, so I don’t innovate only, I don’t design only, I don’t implement only, I don’t support only and I don’t operate only, I do all of that, and that makes me keen investigating how every piece of new innovations will be designed, implemented, supported and operated.
Now speaking about the unified boxes, I was blown away with their capabilities. The capabilities of saving space, time and effort using these boxes are massive, but there is a catch, they use NFS, the source of all evil.
NFS has been used for years by VMware to provide “cost effective” shared storage option, a lot of customer adopted NFS over FC because of the claimed money saving and complexity, but NFS has its own issues (we will see that later).
I was a fan of the technology, and created a suggestion on ideascale.com to bring the issue to the PG attention, we did our best but Microsoft came back and informed us that NFS won’t be supported, they have their own justifications, we are not here to speak about it because we can’t judge Microsoft, but the bottom line, NFS is not supported as storage connectivity protocol for Exchange.
Now the reason of this post is to highlight to the community 2 things:
- NFS is not supported by Microsoft for Exchange (any version), there is no other workaround this.
- Choosing a unified box as a solution has its own ramifications that you must be aware about.
I am not here to say nutanix/simplivity/VMware VSAN..etc are good or bad, I am highlighting the issues associated with them to you, and the final decision will be yours, totally yours.
I was fortunate to try all of the above, got some boxes to play with and tested them to the bone, the testing revealed some issues, they might not to you, but they are from my point of view:
- Supportability: Microsoft doesn’t support placing Exchange on NFS, with the recent concerns about the value of Exchange virtualization (see a blog post from fellow MVP Devin Ganger http://www.devinonearth.com/2014/07/virtualization-still-isnt-mature/) using these boxes and these set of technologies might not the best way for those specific products, you might want to choose going with physical servers or other options for Exchange/SQL rather than going with non-supported configurations, although that vendors might push you to go for their boxes and blinding you with how great and shiny these solutions are. The bottom line, they are not supported by Microsoft and they won’t in the near future.
- Some of the above uses thin provisioned disks, meaning that disks are not provisioned ahead for Exchange which is the only supported configuration for virtual harddisks for Exchange. Disks are thinly provisioned meaning they are dynamically expanded on the fly as storage consumed which is another not supported configuration.
- The above boxes have no extensibility to FC, also you are limited to a max of 2 * 10 GbE connections (I don’t know if some have 4 but I don’t think so) meaning that you have no option to do FC backups, all the backups will have to go through Gbe Network, we can spend years discussing which is faster or slower, in my environment I run TBs if not PBs of backups and they were always slow on GbE networks, all of our backups as to be done over FC.
- The above means you will run backup, operations, production and management traffic on single team on shared networks, maybe 2 teams or will run it over 1 GbE, this might be fine with you, but for larger environments, it is not.
- The above limitations limits you to a max number of network connection, a single team with 2 NICs might be sufficient to your requirements, 2 teams maybe, but some of my customers have different networking requirements and this will not fit them.
- Some of the above boxes does caching for reads/writes, I have some customers ran into issues when running Exchange jetstress and high IO applications, the only solution as provided by the vendor’s support is to restart the servers to flush the cache drives.
- Some of the vendors running compression/deduplication in software and this requires a virtual machine of 32 GB or larger to start utilizing deduplication.
- All of the above uses NFS, meaning you will lose VAAI, VAAI is very critical as it accelerates storage operations by offloading those tasks directly to the array, you can use VAAI with NFS with virtual machines that has snapshots or running virtual machines, meaning that you rely on the cache or you must shutdown the virtual machines to use VAAI, VAAI is very important and critical element, so you must understand what are the effects of losing it.
- Those boxes don’t provide tiering, tiering is another important if you are running your own private cloud, by allowing you to provision different storage grades to different workloads, also it is important if you want to move hot data to faster tiers and cold data to slower tiers. Tiering touches the heart and soul every cloud (private or public) and you must understand how this will affect your business, operations, charging and business model.
- From support/operations and compliance point of view, you still running unsupported configuration from disk provisioning and storage backend, again it is your call to decide.
I am not saying that unified boxes are bad, they are a great solution for VDI, Big Data, branch offices, web servers and applications servers and maybe databases that support this sort of configuration, but certainly not for Exchange.
We can spend years and ages discussing if the above is correct or not, valid or not and logic or not, but certainly they are concerns that might ring some bills at your end, also it is certain that the above configurations are not supported by Microsoft, and unless Microsoft changes its stance, we can do nothing about it.
We, as MVPs, have done our duty and raised this as a suggestion to Microsoft, but the decision was made not support it, and it is up to you to decide if you want to abide to this or not, we can’t enforce you but it is our duty to highlight this risk and bring it to your attention. And as MVPs and independent experts, we are not attracted to the light like butterflies, it is our duty to look deeper and further beyond the flashlights of the brightest and greatest and understand/explain the implications and consequences of going this route so you can come up with the best technical architecture for your company.
Using Redirect with OWA breaks RSA SecureID authentication
the use of OWA redirect rule is very famous now, this has been outlined in several blog post, the best and the original was Brian’s post here http://briandesmond.com/blog/redirecting-owa-urls-in-exchange-2010/
however, careful must be taken when configuring the above rules specially when you are going to use RSA SecureID authentication, the above configuration will prevent the clients on the OWA from accessing the WebID virtual directory and the browser will stop at the path OWA/WebID/IISWebAgentIF.dll with a blank page.
to solve this issue, you will need to stop the redirect and use another method (maybe Java redirect script) because you will not be able to use RSA SecureID with the redirect.
other notes to be considered when configuring OWA with RSA SecureID:
- Make sure to follow the steps outlined in the WebAgent_IIS.pdf document.
- make sure to configure the RSA application pool with admin account (this is mentioned in the document but can be easily overlooked).
- make sure to have the securid file created (install the Windows Agent and do test authentication), the documentation instructs you to download the RSA SDK and use the agent_nsload.exe and convert the file to the web agent format, this is not correct, just copy the file form the authdata folder to the web agent installation directory.
Exchange 2010 Supportability with Hyper-v Replica
I got a question from one of my colleagues about Exchange 2010 DAG support and Hyper-v Replica, Hyper-v Replica is a great feature that was shipped with Microsoft Windows Server 2012, it enables customers to replicate VMs from site to site for DR purposes.
a confusing diagram is published here http://technet.microsoft.com/en-us/library/hh831716.aspx and that implies that Exchange is supported with Hyper-v Replica.
the solid statement that I had and confirmed by the Exchange product group that Hyper-v Replica is not supported at all with Exchange products (2010/2013) and in DAG and without DAG, if you want to protect Exchange server you must configure a DAG and use the Exchange level replication technology or use a 3rd party replication software or hardware that is certified to work with Exchange.
Backup&Restore Exchange 2010 mailbox database or mailbox item using ARCserve R16 #msexchange #arcserve
In my ultimate Journey discovering how to backup and restore Exchange 2010 by every single application on our universe, I blog today about how to do that using CA’s ARCserve r16 SP1.
We will continue using my single Exchange server hen installing ARCserver r16 SP1 and then discovering how to make a backup job to backup Exchange and Restore from our backup.
Installing ARCserve r16 SP1:
There is nothing genius about installing the ARCserve, you possible want to plan ahead for the following:
other than that, the installation itself is no brainer, next, next and ok ![]()
Configuring ARCserve r16 Devices:
Once you are finished installing and opening the ARCserve console “Manage”, you will be prompt with a very nice tutorial that walks you through the basic configuration of your ARCserve.
In this step we will configure “Disk device” that we will use for our backup to disk, so from Devices choose launch device configuration:
In the Login Server screen, enter your credentials to login to the server:
In the Login Server choose your login server:
In the Device Configuration screen, choose Windows File System Devices to configure a backup folder (the de-duplication device is a folder that could configured to store multiple backups, the ARCserve then divide the backup to small chunks that is compared and de-duplicated using the proprietary ARCserve algorithm) then click add:
and if you somehow missed the wizard, you can do the same using the device wizard from the administration menu:
Once the Device is configured, we can deploy the Agent and start protecting our Exchange server, you can do that from the administration, and then go to Agent Deployment :
Note: In Order to backup the Exchange server using ARCserve you must installing MAPI CDO, this is a must because unlike Symantec which uses EWS to restore emails, ARCserve using MAPI CDO to backup and restore individual email, also note that MAPI CDO must be installed before installing the ARCserve if you don’t you will get the following error message:
“The request is denied by the agent. The requested agent is not installed.”
When you deploy the agents for the first time, you must specify the ARCserve source to copy the agents from it, once copied you won’t need to do that again and you will be able to proceed with the deployment:
Once copied, you will proceed with the agent deployment, so specify the Login Server:
In the agent installation option and normally you will get the automatic, you might want to choose custom to fine tune the installation options:
In the agent select the agents that needs to be deployed:
In the host selection, you have a nice option here to discover the Exchange servers and deploy the agent to them automatically:
to discover the Exchange infrastructure, Just specify you Domain Controller and credentials and the ARCserve will discover the Exchange server for you, nice!!!:
Backup Exchange 2010 Mailbox Database and Mailboxes using ARCserve:
To Create a backup job, it is so easy, from the Protection & Recovery menu choose Backup:
From the Job Setup Menu select your Job Setup Type:
In the Source, select the Mailbox Database, if you want to recover specific mailboxes or mailox items you must configure the Document Level Type backup, unlike Symantec which uses 1 type of backups to either restore Mailbox Database or Mailbox or Mailbox item, ARCserve uses 2 types of backup (mailbox database backup for mailbox level and Mailbox Document level for Mailboxes and Mailbox items):
In the Schedule, select your scheduling:
In the Destination, select your destination, in my case I will use the folder I already configured previously:
Once all set, click the Submit button to submit the job for run.
Restore the Exchange Mailbox Database or Mailbox items from the ARCserve Backup:
Now you can restore either the Mailbox Database or the Mailbox items, you can go to the Restore section, explore the Exchange infrastructure and either select the Mailbox Database or the Mailbox Items:
Conclusion:
In this Article we have explored the basic ARCserve configuration and how to backup and restore Exchange 2010 Mailbox and Mailboxes using ARCserve. it was easy and sweet although I don’t understand why in ARCserve I have to create 2 jobs and duplicates to backup Mailbox Database and Mailboxes (Document level).
So what is the next product, I don’t know I will be waiting for your suggestions ![]() , so let me know so I can blog it.
, so let me know so I can blog it.
Restoring Entire Mailbox Exchange 2010 Database using Backup Exec 2012 #Symantec #backupexec #msexchange
In previous posts we have seen how to backup Mailbox database and restore single item from the backup.
In this post we will explore how to restore the entire database to its original location, although you might ask why would I do that when I can restore the item that I want directly from my backup set, Well there might be some scenarios where you want to restore an entire database:
– Database corruption either physically or logically.
– reseed operation.
– restoring to restore database for finer search and extraction.
we will use the same backup we did last time to restore the entire database, let us start:
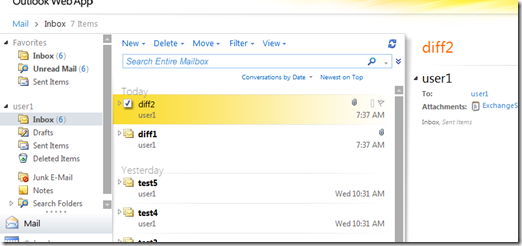
User one received 2 emails (Diff 1 and Diff2):
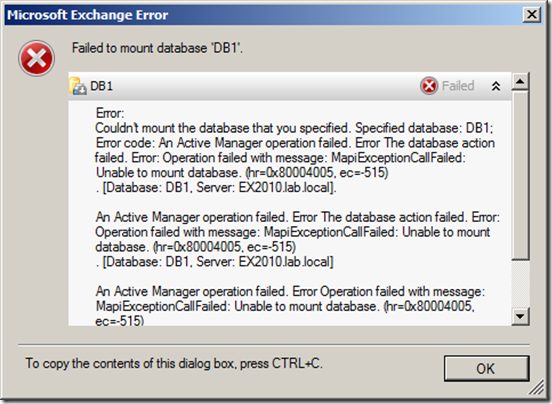
It looks that those emails some how caused a Database corruption, and the database is dismounted and can’t be mounted again (this simulates a logical or physical corruption at the database level):
If I try to mount it I get the error:
Also there is an error in the event viewer:
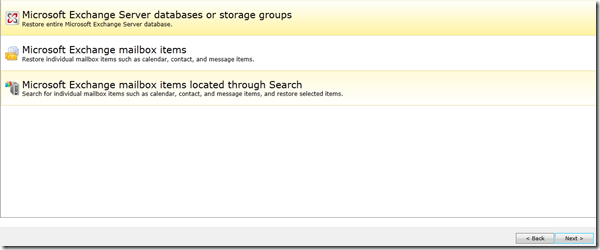
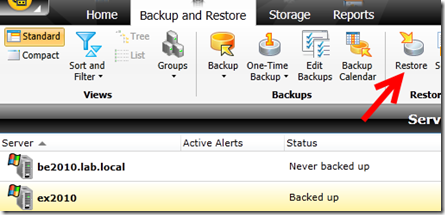
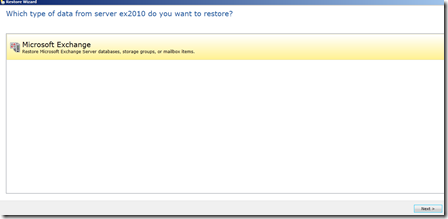
Now I need to restore the entire database, from the Backup Exec management console Select the Exchange server and click restore, in the restore type, select Microsoft Exchange databases or storage groups:
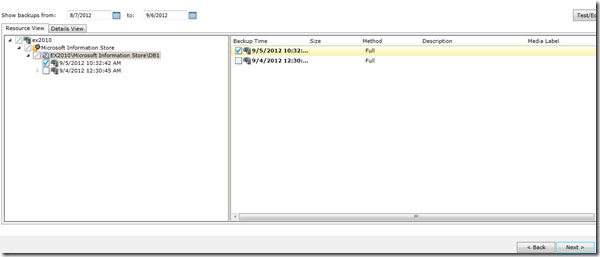
In the Resource view, select the backup job you want to restore:
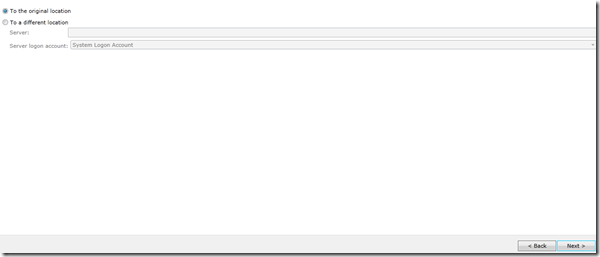
In the restore location, I will choose the original location since I want to restore it on top of the current one since the current one is corrupted, you might want to restore it to another location or the recovery database or to another server in case of dial-tone recovery.
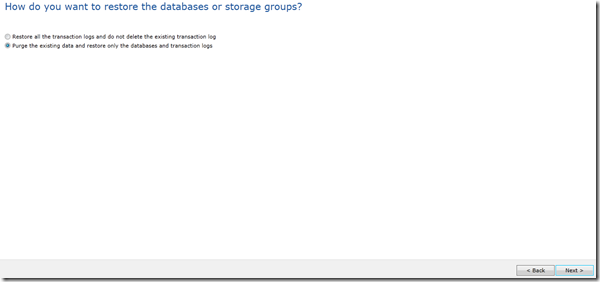
In the overwrite page, I will choose to overwrite existing DB and logs, if you trust that logs are ok and your DB is having troubles due to a corrupted harddisk for example you can restore the database set and keep exiting logs and when the replay starts it will restore the database into the most recent status, however in my case there is a logical corruption caused by bad emails thus bad logs, so I don’t want these and I will overwrite them:
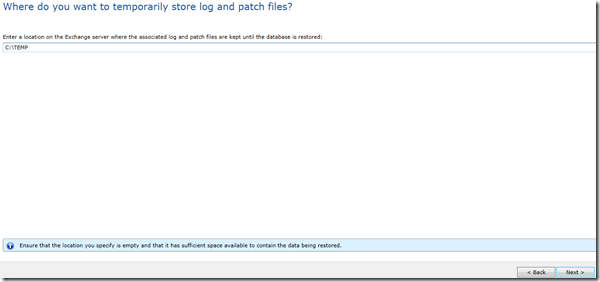
In the Temporary location, I will chose the default location, but you need to make sure that the selected location has enough space to hold the restored data:
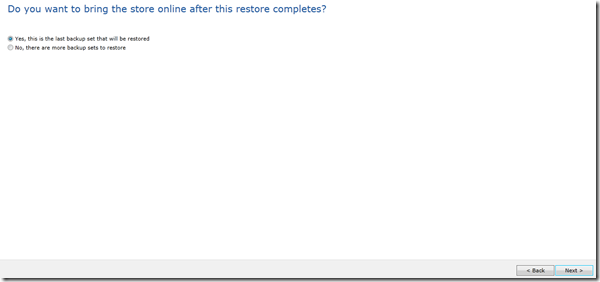
In the next screen, you have the option to wait to start mounting the database, if you are restoring from differential backup or you want to run eseutil before mounting the database for example you might want not to mount the database otherwise, the backup exec will mount the database and start playing the logs directly, in my case I will choose to mount the database:
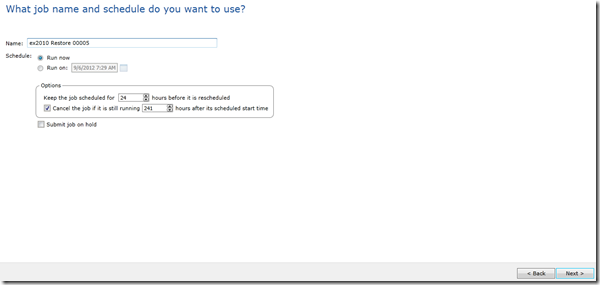
In the job name and schedule, set your options and click next:
on done, go to the Job list, select the restore job and click run now, the job will start restoring your database:
after the restore completes, the DB is mounted and everything is back to track :
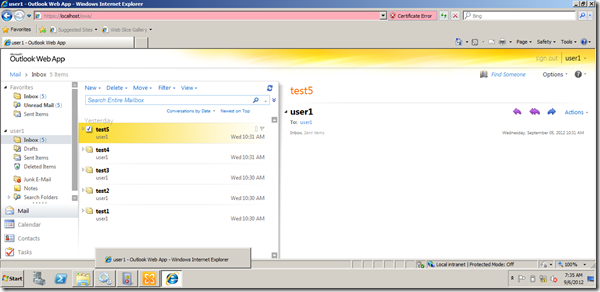
User1 can login now to his mailbox, but you will note that Diff1 and Diff2 emails (the problematic ones) are not restored since they are weren’t backed up:
In the next post we will see how to restore differential backup, we have been talking about the full backups and we will see how to configure and restore differential backups.
How to Restore Exchange 2010 Mailbox or Mailbox Item using Backup Exec 2012 #msexchange #backupexec #symantec
In This post we will explore how to restore a mailbox or a single mailbox item using Backup Exec 2012 to Exchange 2012.
Setting up the stage:
you need to make sure that you have a working backup set, we will continue from our configuration we have committed in the first part of this series: https://autodiscover.wordpress.com/2012/09/04/how-to-backup-exchange-2010-using-symantec-backup-exec-2012-msexchange-microsoft-symantec-backupexec/
To Restore a single item from the backup set:
Note: your backup job must have been configured to use GRT, otherwise you will not be able to recover single item from the mailbox database.
select your Exchange server, and choose restore:
In the data selection page, select the Exchange data and click next:
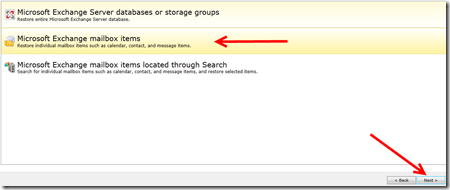
In the following screen and for the sake of this part of the article select mailbox item and click next:
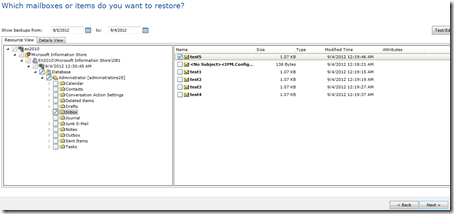
In which mailbox and items do you want to restore, explore the database and mailbox to find the item you want to restore, in my case I want to restore the mail item “Test 5” which was in the administrator mailbox and I have deleted it:
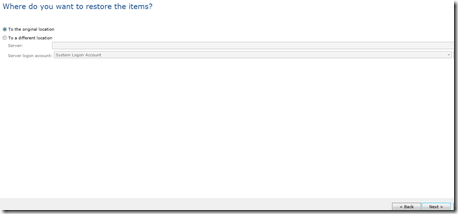
Select the location of the restore, in our case I will restore it to the original location (the administrator inbox):
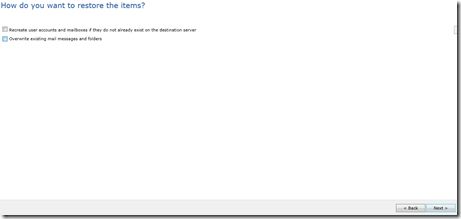
in the following screen, Select the options as per your restore preference, in my case I will select none and continue:
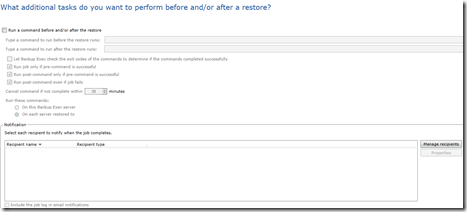
In the additional tasks, you have the option to notify some users or run pre-commands, it is a nice option and new to Backup Exec 2012 “I Loved it”, in my case I will continue:
In the summary page click next and then the restore job starts.
Now if you believe that the restore will work, I would like to tell with a lot of joy it will not ![]() .
.
I spent 2 days trying to figure out the reason why the restore is not working, I was getting this misleading error:
The job failed with the following error: Cannot log on to EWS with the specified credentials. Review the resource credentials for the job, and then run the job again
I searched for the error and found a knowledge base from Symantec stating that I need to configure the service account in the form of “account@domain.name” not “domain\account”, I did that and even suspected in the SSL certificate and created a new one with no luck no matter how hard I tried, it didn’t work.
so back to the basics, I read the BE admin guide, and went to the GRT restore part to find interesting statement:
Backup Exec also creates an impersonation role and a role assignment for Exchange
Impersonation. Exchange Impersonation role assignment associates the
impersonation role with the Backup Exec resource credentials you specify for the
restore job.
Backup Exec creates and assigns the following roles:
■ SymantecEWSImpersonationRole
■ SymantecEWSImpersonationRoleAssignment
and all of a sudden things started to make sense, to access EWS and restore item for another mailbox, you MUST have the impersonation rights, well powershelling my Exchange server, I didn’t find the mentioned roles, it looks like setup is broken and didn’t create them or they weren’t created on my server for a reason or another.
to fix this issue, assign the BEadmin the impersonation permissions using the following cmdlets:
1- Command to create a new role called SymantecEWSImpersonationRole:
New-ManagementRole -Name SymantecEWSImpersonationRole -Parent ApplicationImpersonation2- Command to assign a user to SymantecEWSImpersonationRoleAssignment:
New-ManagementRoleAssignment -Role SymantecEWSImpersonationRole -User Username SymantecEWSImpersonationRoleAssignment
Reference: http://www.symantec.com/business/support/index?page=content&id=TECH125119
trying again I got a very nice error “again” ![]() :
:
The job failed with the following error: Cannot restore one or more mailboxes. The database that the mailboxes reside in is dismounted or is not accessible. Ensure that the server is available and that the database is mounted, and then run the job again.
Honestly I was trying to restore the administrator mailbox, so I tried to restore a normal user and it worked ![]() .
.
Lessons learnt: don’t be misled by error messages, and it is always reading the architecture again and again for every feature you are using.
by now you should be able to restore single item from your Backup Exec 2012 backup, next blog post will talk about restoring an entire database.
have fun !!!
How to Backup Exchange 2010 using Symantec Backup Exec 2012 #msexchange #Microsoft #Symantec #backupexec
The Single Item Restore article has been Published here: https://autodiscover.wordpress.com/2012/09/06/how-to-restore-exchange-2010-mailbox-or-mailbox-item-using-backup-exec-2012-msexchange-backupexec-symantec/
I would like to continue my successful blog series on Backup and restore Exchange 2010, the previous 2 entries where the most visited entries during the past 5 months, I will continue with the Backup Exec 2012 and hopefully I will be able to reach netbackup later this month.
so let us setup the stage:
Configuring the Backup Exec 2012 Service Account:
referencing my previous blog https://autodiscover.wordpress.com/2012/03/12/how-to-backup-and-restore-exchange-2010-using-symantec-backup-exec-exchange2010-backupexec-part1/ ;the backup exec service account requirement has not changed, below are the required permissions for the service account to perform backup and restore:
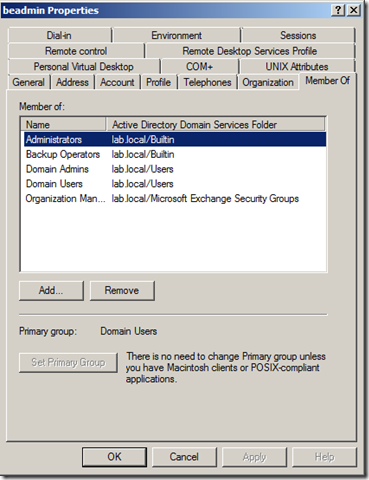
1. For non-GRT backups (database only with no granular restore functionality) the logon account specified must be a member of the local Backup Operators group on the Exchange server
2. For database only restores (database only with no granular restore functionality) the logon account specified must be a member of the local Administrators group on the Exchange server
3. For GRT (Granular Restore Technology) enabled backups to disk (where the disk device is local to the BE Media Server and in the same domain) the logon account specified must be a member of the local Administrators group on the Exchange server
4. For GRT backups to a tape device and ALL GRT restore operations, from tape or disk, the logon account specified must be a member of the local Administrators group on the Exchange server. In addition, the logon account must have a unique mailbox and the mailbox can NOT be hidden from the Global Address List. For Exchange 2003 the account must also be granted the Exchange Administrator, or Exchange Full Administrator role. On Exchange 2007 and 2010 servers the account must be granted the Exchange Organization Administrator role. Finally, for Exchange 2010 the account must also have the Administrator role on the AD Domain for AD access as part of the GRT operations.
this is a screenshot for the BEadmin group membership:
Prerequisites:
To Backup Exchange 2010 using Backup Exec 2012, you need to make sure that the Exchange management console is installed, you have to make sure that the EMC version is the same as the backed up server version.
Installing the Backup Exec 2012 Agent on the Server:
I got to admit that I was so impressed with the new BE interface, it was “WOOOOOOOOOOOW”, and they did good work with it, it is simple and intuitive and I managed to find everything super fast.
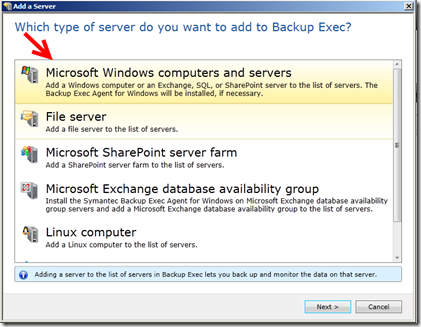
there is now a new wizard for adding server, go to “backup and restore” node and select add from the servers section:
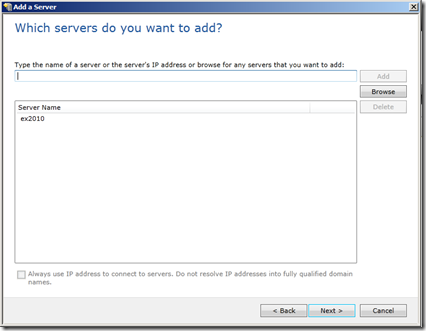
from there you get the new add server wizard, you got 2 options either add server which you use if you have a single Exchange server or Microsoft Exchange Database Availability group and you use this option if you have DAG, in my lab I don’t have a dag so I will go with the add server:
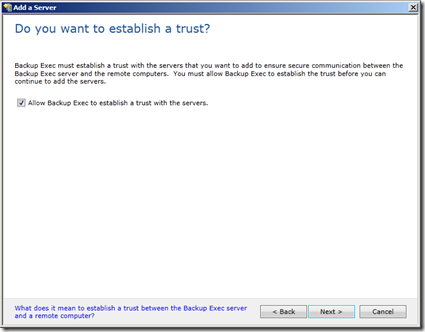
select enable the trust with the server:
add the server:
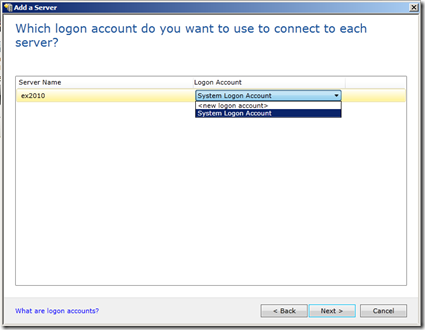
In the service account section, you can either choose to use the default system account or use another account, I configured the BE server to use my “beadmin” account as its service account so I will select the default account, but again and it is very important to make sure that this account has the required permissions on the Exchange server:
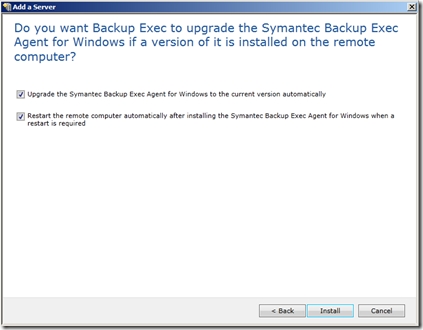
In the next page, make sure to select reboot the server option if you want the server to reboot directly after the installation, otherwise you will have to reboot it manually it depends on your environment:
then click install to install the agent.
Configuring the Backup Jobs:
I am configuring a normal backup to folder job, the actual media configuration is beyond the scope of this article.
to create a backup job:
1- Select the Exchange 2010 server in the section.
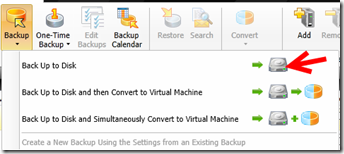
2- open the backup node and select “Backup to Disk”
Note: as per my knowledge this is the same steps you will use for tapes or network share backup
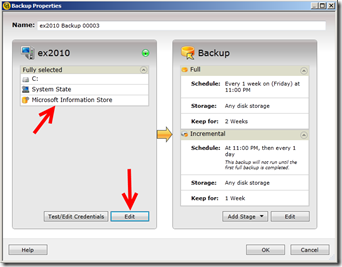
you will note that BE detected the information store on the Exchange 2010 server, by default it will backup all the items on the Exchange server including all drives, system state and DBs on the server, if you want to edit it click edit:
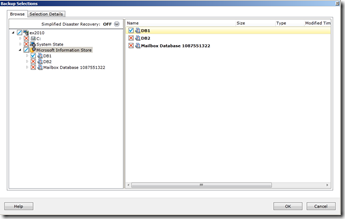
expand the information store section and select the desired database to backup:
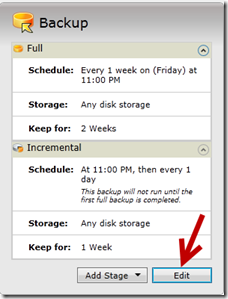
going back to the backup properties, in the backup details click edit:
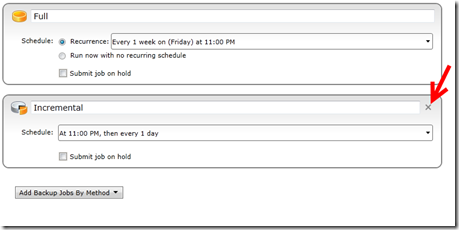
by default the backup job is configured to perform weekly backup and daily incremental, you might want to edit that as per your need, in my scenario I will be fine with only the full backup so I will delete the incremental step:
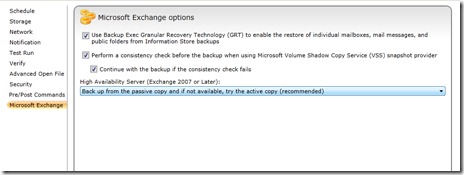
also make sure to select enable GRT backup to be able to restore single mailbox or single item (if this is not selected you will not be able to restore mailboxes or mailbox items from the backup exec):
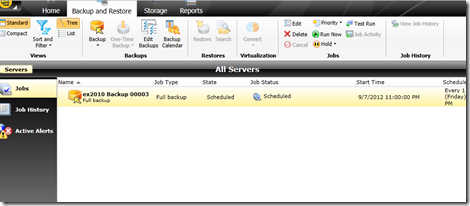
the backup job is scheduled, you can see it by going to the Jobs section:
to run it, select the job and choose run now, this will run the job immediately.
after backup completion, go to the job history and confirm that backup completed successfully:
Congratulations, you have completed your task backing up your Exchange server, in the next blog post we will explore the restoration options for the this backup job.
No More local names in the certificate starting November 2015 #MsExchange #Lync #ucoms #lync2010 #Microsoft Part1
Starting November 2015 all public domains providers will prohibit the use of invalid domain names, this is because internal servers names are common and could be falsified and end server connection can’t be assured, you can read more about it here
http://www.digicert.com/internal-names.htm
and
http://www.networking4all.com/en/ssl+certificates/faq/change+san+issue/
The reason that is given for the change is that the internal server names are not unique and therefore easy to falsify. With common names like server01 or webmail, the end user is never sure if it is actually dealing with the right party or with a malicious.
The changing legislation for SSL Certificates shall start on 1 November 2015. This means, from that date, the invalid Fully-Qualified Domain Names (hereafter called FQDN) will no longer be accepted at the standard of the CA/Browser Forum and after that date such certificates may no longer be issued. All certificates issued after 1 November 2015 and meet this qualification will be revoked upon discovery.
Users who are requesting a certificate on an invalid FQDN with an expiration date after 1 November 2015 should remember that their certificates will be revoked after 1 November 2015. After this date, no SAN SSL Certificate with a reserved IP address or internal server name will be issued either.
you can download the new certificate requirement for the cabforum here http://www.cabforum.org/Baseline_Requirements_V1.pdf
What does that means:
if you are running your domain using an invalid name (.local or .dom) you might face some issues depending on your configuration, the most commonly affected applications by this changes are Microsoft Exchange and Microsoft Lync servers.
for years we have been using the UCC certificate which allowed us to include internal server names along within the public certificate which offered a simplified configuration, I do believe that this change will require massive changes in the Exchange and Lync infrastructure to support this change.
For Microsoft Exchange:
Depending on your configuration you might need to do some changes in your infrastructure to support this change, let us divide the configuration as following:
1- Your Active Directory domain name is domain.com or other valid domain names:
if your Active Directory domain is running domain.com name or other valid domain names, then most probably your changes are minimal, the only catch here if your users are accessing OWA using https://mail or https://Exchange internally for end users simplicity, this will not be supported or working anymore and you will need to work with your end-users to fix that.
2- your Active Directory domain is domain.local (or other invalid name):
oooh baby, you will have fun, because of how internal and external URLs in Exchange are functioning you will need to do more than just a new certificate request for your servers, but again it depends on how you configured your Exchange servers:
For a single Active Directory site deployment:
If your Internal URLs for Exchange Webservices uses External names, then you are fine, but if you are running a single Website for OWA, OAB and other webservices functionality, you will have to consider 2 solutions:
- Change the internal names of the vDirectories to include public domain names (.com or .net for example) this will require creating the correct DNS zones in Active Directory (domain.<valid domain>) and configure the entries in that DNS zone to map to the correct internal and external IPs (some services will point to internal IPs like Exchange webservices and some will point to External IPs like your website for example), you might also require some changes in the certificate to include the new names or purchase a new certificate to accommodate the new names.
- Create a new website on the Exchange and split the traffic between the External website and the internal website, for the new website you will need to include the correct names (either internal and External) and configure a new IP for the CAS servers, using host headers with OWA and ECP currently breaks OWA/ECP thus you will need to assign your CAS servers new IP, and configure the websites to listen on its corresponding IPs and configure publishing rules to publish the new configuration (this also depends on your network infrastructure and firewall configuration).
- External Names and its certificate will need to be revisited to issue the correct names in the certificate, I am not sure whether old certificate will be revoked or kept as-is, but if they will be kept until they are revoked and never re-issues then you can skip this step.
- You might need to check you NLB configuration if it is there to include a new NLB IP for the internal Names.
For a Multi Active Directory site deployment:
again it depends on your configuration, and this might be a little tricky because or redirection and proxying, I have tried to simplify it but I couldn’t as there are various factors and configurations but here are some guidelines:
- Document how you are doing OWA and webservices right now, also how your are doing your proxy or redirect configuration.
- External Names and its certificate will need to be revisited to issue the correct names in the certificate, I am not sure whether old certificate will be revoked or kept as-is, but if they will be kept until they are revoked and never re-issues then you can skip this step.
- Internal Names will need to be checked and either re-mapped to names that includes valid external domains and this will require DNS and certificate changes as I stated above.
- Internal names that will be kept internal will need to use their own website, new IPs and Certificate which might be re-issued, also you might want to re-visit your NLB configuration, also you will need to check you NLB configuration.
- you will need to revisit your InternalNLBBypassUrl , the recommendation is not to change it from the internal server name and for the time being I don’t have another recommendations, and until then and if you do Proxy across the sites you might stuck with the new website option
in part 2 we will see how the change affects Lync 2010.
How to backup and restore Exchange 2010 using Backup Exec 2010 #Exchange2010 Part2 #Exchange #backupexec #symantec #mvpbuzz
for Backup Exec 2012 version of this series check my article: https://autodiscover.wordpress.com/2012/09/04/how-to-backup-exchange-2010-using-symantec-backup-exec-2012-msexchange-microsoft-symantec-backupexec/
In this part we will explore the options to backup and restore the data using Backupexec from the Exchange Server.
Backupexec offers 2 ways to restore the data to Exchange:
- Using Mailbox database restore, which restore the entire database this could be used in case of database corruption either logically or physically.
- restore individual mailbox or mail items (mail or attachment for example) from the backup set, this is a more practical solution in day to day operations in case of email item got deleted or a mailbox needed to be recovered for a reason or another, in order to restore a mailbox or individual email item, BE uses the Exchange web services to restore the mailbox or the email item thus you need to be aware of any network/firewall requirements that might be needed to make this happens.for the sake of this blog post, we will explore option 2 (restoring individual email items and mailboxes) since option 1 will be explored in the following blog post exploring corrupted databases, lost logs and dirty shutdowns.Exchange 2010 Backup job Creation:
to create a backup for the Exchange 2010, open the BE management console and create a backup job, from the job creation section:
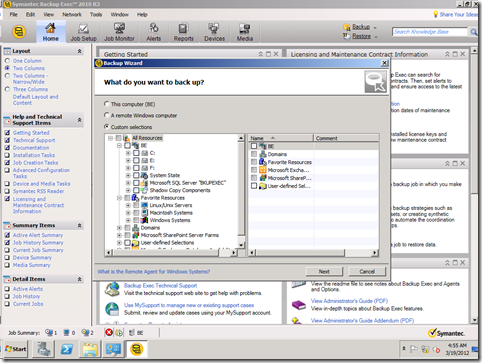
from the wizard point to the Custom Selection to be able to select individual mailboxes/databases, otherwise you will select the hall DAG and backup all of the mailbox databases
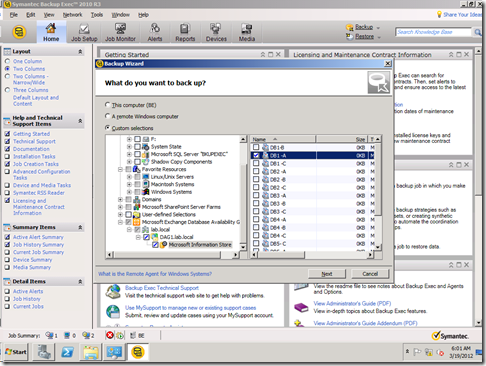
in the custom selection select the mailbox database you want to backup, in order to select the mailbox database browse the Microsoft Exchange databse availability group > yourdomain > DAG FQDN > then point to Microsoft Information store and the individual mailbox databases will be displayed in the right pane, then select the desired database, in my case it is “DB1 – A”
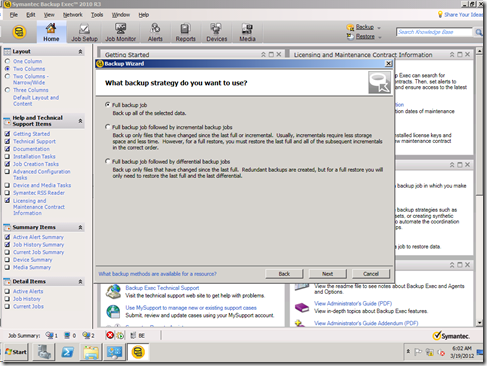
In the “Backup Strategy” Page, select the desired backup strategy, for the sake of this configuration I will select Full Backup, you might want to consider other options based on your environment
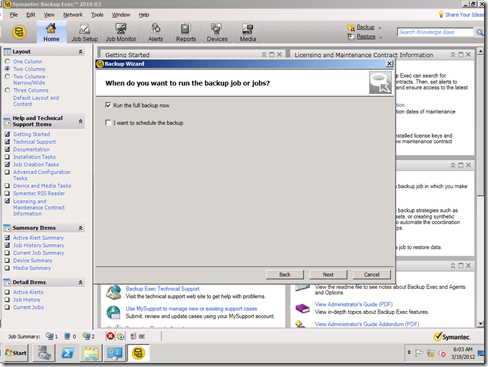
in the backup schedule, select the backup the job now to run the job immediately:
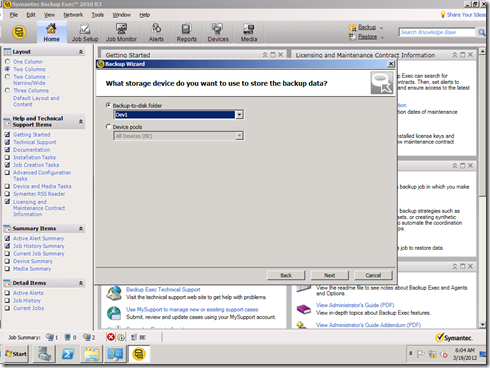
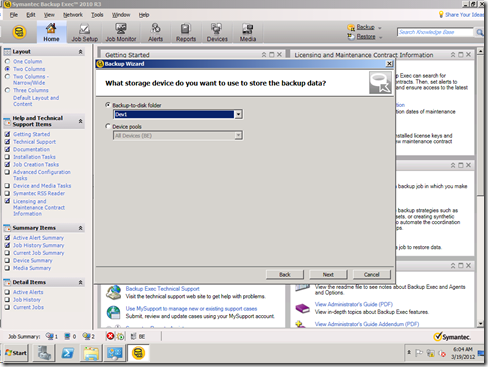
in the backup destination, select the available backup devices:
Note: in this blog I selected a device call DEV1 which represent ad backup to disk location I have configured in the initial BE configuration, this configuration is outside the coverage of this blog post
In the “how long do you want to keep the data” I selected keep infinitely, you might want to consider other options based on your configuration
in the job name type a name that identifies the backup job, then click submit:
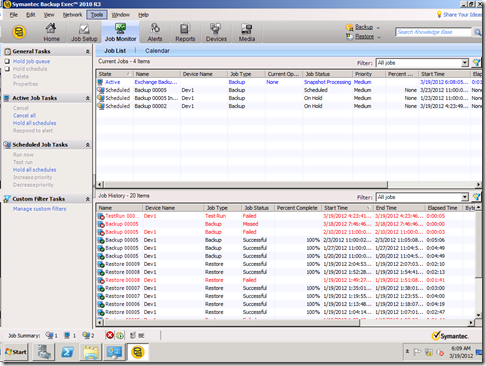
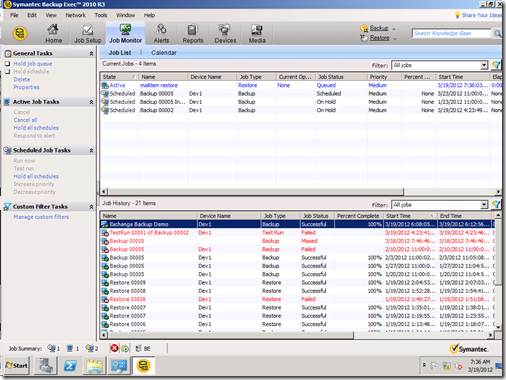
you can now monitor the job progress in the “Job Monitor” section:
Exchange 2010 Restore job Creation:
as I mentioned earlier, the scope of this blog post will cover individual Mailbox or mail item restore, mailbox database restore will be covered in later blog posts.
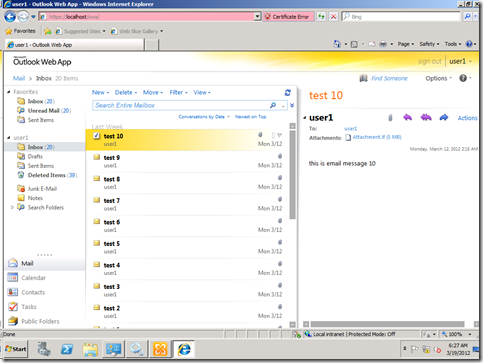
to restore a mail item let us first login as user1 from the OWA:
I used a C# application to sent user1 several emails to generate the emails that can be used in restore and logs.
now let us delete the emails from 5 to 10 and try to restore them from the BE backup we just did.
now I did a hard delete for the emails:
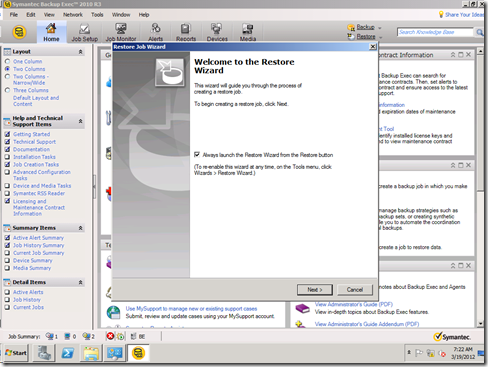
now to restore those emails, let us create a backup restore job, in the welcome to the restore wizard click next:
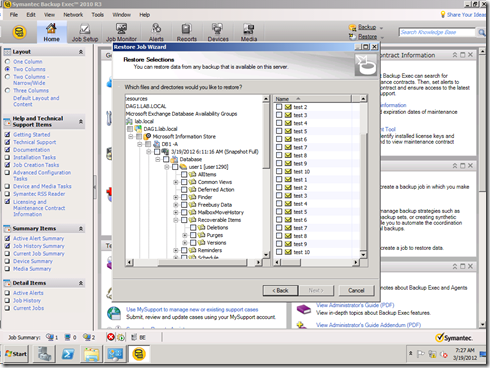
in the next screen you have 2 options either select the mailbox you want to restore (or the database) or the individual email item, the restore process for mailbox/item differs from the mailbox database restore since the first uses the EWS to restore those items, I will select the individual items I want to restore (test message 4 to 10) and restore them, to do that open the user 1 mailbox in the restore selection pane:
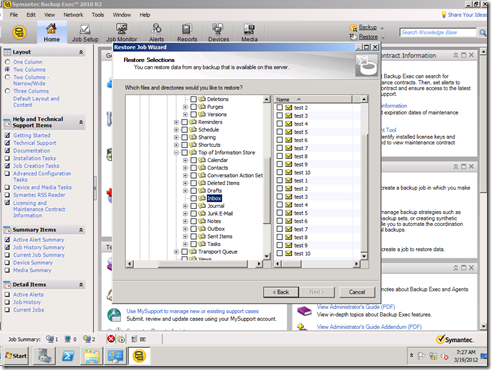
go the top of information store and select it (don’t tick the selection box yet):
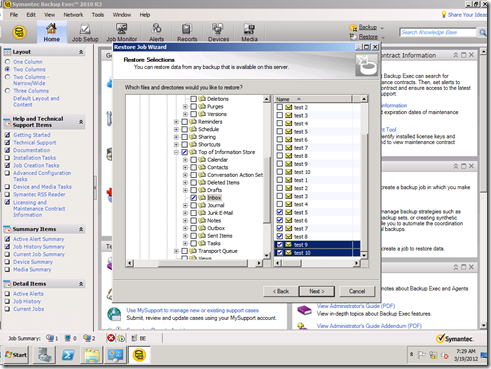
and select the individual emails you want to restore back and click next:
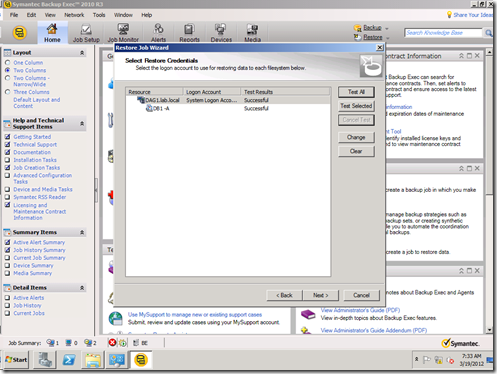
in the restore credential page, make sure to select an account that has the permissions we talked about in the Part1 of the article, to validate the account permission click test and continue only when successful:
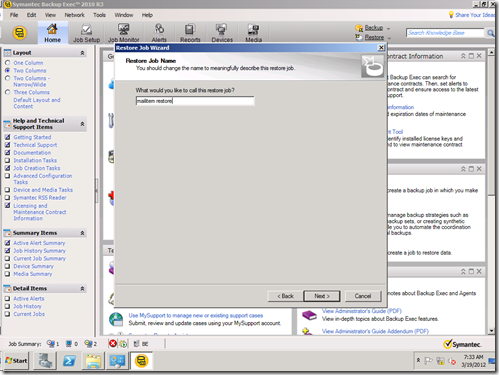
in the job name, type something useful, and click next
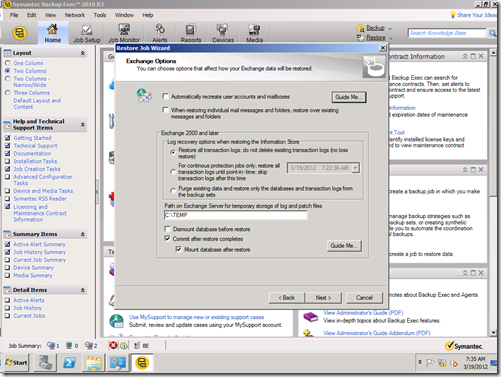
in the Exchange options, keep the defaults and click next:
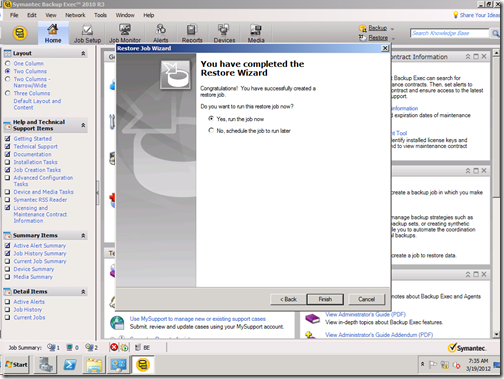
at the wizard end page, choose to restore now and click next:
and you can monitor it in the jon monitor section
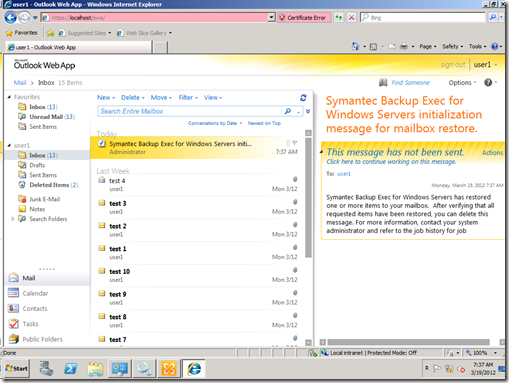
if the user is currently logged in, he will receive the following message from administrator:
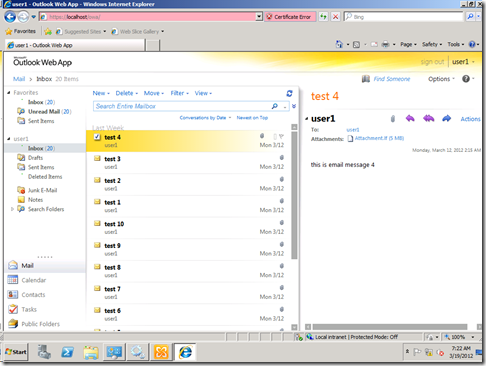
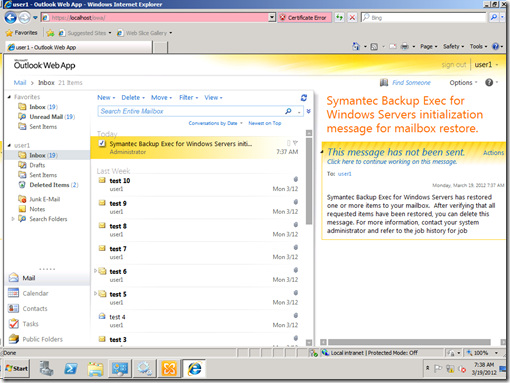
after the job completion, in the OWA the user will find the restored items:
Summary:
In this article we explored the individual items/mailbox restore from the Backupexec 2010 to the Exchange DAG, we will explore the mailbox database backup/restore in more details with multiple variations in the following parts of this series, so keep following us ![]() .
.
Mahmoud


