Archive
زا ميستريوس كيس اوف الويب سايت اللي تزوره يخترقك
زا ميستريوس كيس اوف الويب سايت اللي تزوره يخترقك
واحدة من اكبر الاسئلة اللي بحاول اشرحها لأي حد و خصوصا لو مش متخصص في امن المعلومات انه مجرد زيارتك لويب سايت غير امن ، ممكن تكون كفيلة باختراقك ، مشكلة شركات كتير دلوقتي مش بس مكافحة السبام ، بس مكافحة اليوزرز اللي بيزوروا مواقع غير امنه ، الاي تي اللي شغال كراكات و مش شابه و غيره و غيره
المشكلة انه عندنا اعتماد و ثقة كبيرة اوي في الانتي فايروس ، بس ده غير كافي بالمرة ، و علشان نوضح الفكرة ، خلينا نشوف
=====================
اشتغلت امبارح على ديمو كده علشان محتاج اعمل
Fileless Dropper
علشان نبين ثغرات امنية معينة ، بس لحظة هو ايه ال
Fileless Dropper
ده يا باشا
====================
ناس كتير متخيلة انه ال
Malware or virus
بينتشر من خلال انه يضغط على فايل تنفيذي
Executable
معين ، بس في انواع متطورة من الاختراق بتعتمد انه بس تزور لينك او ويب سايت او حتى ايميل جايلك علشان تخترق اصلا ، ده بيتم من خلال ال
Fileless attack
اللي بيكون من خلال جافا سكريبت خبيثة بتتنفذ من غير علمك و تفشخك فبمجرد فتح الويب سايت بيتم تنحميل او تنفيذ برنامج بدون علمك، طب ازاي برضك يعني
======================
الصورة الاولى هي من جافا سكريبت بسيطة جدا بتوضح ازاي بيتم اختراقك ، الجافا سكريبت دي ديمو هدفها انها تشغل برنامج بيطبع شاشة
Hello world

لا اكثر و لا اقل ، بس تعالى نشوف اصلا هي شغالة ازاي:
=====================
الكود بتاع الجافا سكريبت دي هنا:
https://github.com/MalavVyas/FilelessJSMalwareDropper
و تعالى نراجع نشوف هي شغالة ازاي ، لاحظ انه في الصورة الثانية محدش تعرف على الجافا سكريبت انها تحتوي كود تنفيذي الا شوية برامج بسيطة جدا و محدش فهم تقريبا انها

Dropper
تعالى نبص على الكود
==============
الجولة الاولى: الكود شكلة برئ
لو بصيت على الكود مش حتلاقي حاجة بتقول انه الكود ده بينفذ اي حاجة ، مريبة عجيبة ، الكود بيطلع رسالة تنبيه بسيطة من الكود ده
alert(new Function(SnccpSrYKfxmqjJk())());
لو راجعت الدالة
SnccpSrYKfxmqjJk
حتلاقي انها
Anonymous function
بتنادي على متغيرات من فوق منها المتغير
UBkDUhSPnYjP
اللي هو كود طووووووووووووييل مشفر ، هنا يبتدي اللعب
بص على تفاصيل الدالة:
الدالة بتبتدي بالمتغير
_0x46b2dd
اللي بياخد كل اربع حروف من التيكست المشفر و يجمع و يطرح عليه و يرجع القيمة من
UTF 16 string
HMPTQXTNBJUV += String[‘fromCharCode’](_0x36455c);
و بيجمعه في المتغير
HMPTQXTNBJUV
اللي بيرجع في الاخل و يتنفذ في الدالة
SnccpSrYKfxmqjJk
انترستنج
======================
الجولة الثانية:
بعد تجميع و فك تشفير الكود ، طلع كود تاني خالص ، كود طويل عريض فشخ ، حاختصرلك اهم اللقطات اللي فيه ، هو زي الكود اللي فوق ، كود مشفر طويل عريض معمول له تشفير بدالة مختلفة تانية خاااااااالص ، و بيرجع كود
Anonymous
بيتم تنفيذه هو كمان
alert(new Function(SnccpSrYKfxmqjJk())())
ladlloYdTMckcxV = uvqwdfyuwtrzln.indexOf(UBkDUhSPnYjP.charAt(cNskABPCjWZHTMl++));
dycsldgepqeurce = uvqwdfyuwtrzln.indexOf(UBkDUhSPnYjP.charAt(cNskABPCjWZHTMl++));
ejFUWevikvv = uvqwdfyuwtrzln.indexOf(UBkDUhSPnYjP.charAt(cNskABPCjWZHTMl++));
OPOUYPHZPPSPXENMI = uvqwdfyuwtrzln.indexOf(UBkDUhSPnYjP.charAt(cNskABPCjWZHTMl++));
kznyohlxdidjrlrkw = ((ejFUWevikvv & 3) << (2766/vxdeabpuqqh)) | OPOUYPHZPPSPXENMI;
dczhnsicylpqyciye = (ladlloYdTMckcxV << (DkrJItsLVccgD/35)) | (dycsldgepqeurce >> (1148/bkiwKJMAPyUiNYL));
MSMSPYENLYFXRKBBM = ((dycsldgepqeurce & (nlmczdyawfwbb-(1441))) << (1148/bkiwKJMAPyUiNYL)) | (ejFUWevikvv >> (DkrJItsLVccgD/35));;
HMPTQXTNBJUV+=String.fromCharCode(MSMSPYENLYFXRKBBM);
طب ايه طيب ، اتقل
================
الجولة الثالثة
بعد تجميع الكود اللي طلع من الكود الثاني اللي طلع من الكود الاولاني ، طلع الكود الاخير اللي فعلا هدفه اختراقك ، في حالتنا دي هو مش بيعمل الا
Hello World
بسيط ، بس تعالى نشوف هو شغال ازاي
الكود بيبتدي ب دالة بتكتب البايلود
function WritePayload(name)
{
var v1 = 1
var v2 = 2
var v3 = 2
var codePage=’437′;
اللي بتاخد المتغير
PayloadString
ملحق بيها دالتين
واحده
base64
و الثانية
RC4
اللي حصل انه الراجل كتب الكود بتاع السي و بعدين عمله تشفير ب
RC4
بباسورد معينة ، و بعدين طلعه في
Base64
في الكود بيتكتب العكس و يطلع ملف تنفيذي بحق ربنا بيتكتب في ال
AppData
من خلال الدالة
Dropfile
اللي بتدور على باث ال
Appdata
بتاع اليوزر بتاعك و تكتب فيه الملف التنفيذي باسم عشوائي و تنفذه
dvar3.WriteAll(rc4(base64(PayloadString),false));
dvar1.Run(dvar2);
=====================
ياسلااااااااااااااااااااااااااااااااااااااااااااااااااااااااااااااااااااااااااااااااااام ، يعني انا مش مضطر اضغط على ملف تنفيذي علشان اتلسع ، لا يا ريس انت بس تفتح ايميل فيه حتة الجافا سكريبت ده و لو الراجل حاطك في دماغه انت منتهي
=====================
طب و الدروبر بتاعي ، علشان انا غلس فممكن حد يوصل انه يفهم التشفير بيتم ازاي و يقرا انه اي تيكست مشفر كتير امنعه مثلا ، فانا روحت عامل الدروبر بالبايتس ، فانا حولت الملف التنفيذي لبايتس و خليت الجافا سكريبت تكتبها من الاول
var payload = new Array();
payload [01] = ’00C7′;
payload [02] = ’00FC’;
payload [03] = ’00E9′;
payload [04] = ’00E2′;
payload [05] = ’00E4′;
payload [06] = ’00E0′;
payload [07] = ’00E5′;
و بعدين بحاول البايتس لستريم و نكتب الستريم ، طب يعني ايه يعني
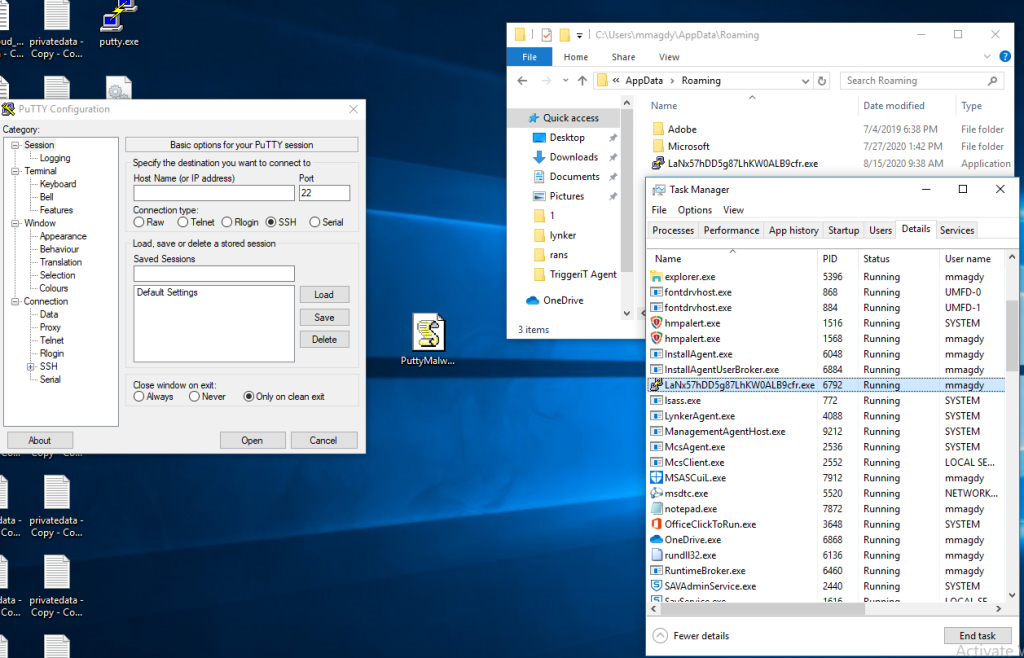
يعني عملت جافاسكريبت دروبر محمل جواه ال
Putty
مجرد ما بتغلط عليه بيشغل ليك ال
Putty
و برضك محدش شافه الا عدد بسيط من الانتي فايروس انه فايروس في الصورة الاخيرة

====================
ابقا حمل كراكات براحتك بقا يا نجم ، هابي ويك انك ايفري وان
مراجع:
https://resources.infosecinstitute.com/reverse-engineering-javascript-obfuscated-dropper/
ذا ميستيريوس كيس اوف الشركات اللي اتنصب عليها في ملايين
على مدار السنة اللي فاتت ، اشتغلت مع كام شركة اتنصب عليهم في كام مليون حلو كده ، الشركات كلها اتنصب عليهم بنفس الطريقة و نفس الاسلوب ، و للاسف رغم انه الخدعة بسيييييطة جدا الا انها صعب جدا كشفها و فعلا جهنمية ، خلينا نشوف
خطوة رقم 3: يوزر بيكون مش راجل تيكنيكال ، بيكون في العادي بيبعت و بيحول فلوس للخارج ، بيجيلو ايميل تقليدي جدا من شركة هو بيتعامل معاها لاوردر جديد و كل حاجة ، الايميل من ايميل الشركة
خطوة رقم 4: بتفضل الايميلات رايحة جاية عادي ، لحد وقت الاوردر بيجي طلب تغيير الحساب اللي بيتحول ليه الفلوس و تفاصيل التحويل الجديد
لحظة ، هو فين رقم واحد و اتنين ، اتقل…
او في وسط الكلام العادي بيجي ايميل من المورد بطلب تغيير الحساب اللي حاتتحل عليه الفلوس ، طلب عادي من ايميل شركة المورد ، و هنا اليوزر الغلبان بيبص على الايميل ، فعلا من ايميل الشركة ، فيبعت يرد عليه يقوله ممكن تأكد التغيير ، فعلا يجيله التأكيد و هوب يحول الفلوس و بخ
في شركة اعرفها اتنصب عليها في مليون و نص ، و واحدة تانية في 2 مليون ، و في شركة كان حايضيع منها 5 مليون
بس فين المشكلة…..ازاي ده بيحصل….تعالى نشوف

لو شوفت الصورة الاولى ، ده ايميل تقليدي بسيط من ايميلي على الاوتلوك لايميلي على الاوتلوك ، الايميل شكله عااااادي جدا ، بص و راجع كويس
طيب حدوس
Reply
الايميل شكله عادي برضو و تقليدي في الصورة التانية ، ب بص تاني كده ، ستوووووووووووووووووووووووب
بص كويس في الصورة التانية ، في حرف متغير في الايميل ، واخد بالك

بدل
Outlook
بقت
Outluok
و هي دي الثغرة اللي اليوزر الغلبان مش بياخد باله منها خااااااااااااااااااااااااااااااالص
تعالى نبص تاني كده للسيناريو بشوية تفاصيل:
خطوة رقم 1: بيكون حصل اختراق للكومبيوتر في مكان ما اما عند الشركة او المورد و حد شاف الايميلات بين الشركات و عرف طريقة صرف و تحويل الفلوس و الاوردر و فضل لابد في الذرة
خطوة رقم اتنين ، فضل مستني لحد ما اوردر معين حايتحط او تحويل فلوس حايتم و هنا الهاكر يبتدي شغله ، يبعت ايميل من الايميل سيرفر بتاعه بس يضيف في الايميل اللي بيتبعت
Header
بسيط اسمه
Reply-to
في الصورة التالتة حتشوف اني ضفت الهيدر
هنا اما بيجي الايميل في الخطوة 3 ، فهو بيجي شكله من الشركة و طبيعي بطلب تغيير الحساب او تحويل فلوس او او او ، و هنا الراجل بيرد عادي و يطلب التأكيد ، هنا يشتغل ال
Reply-to
و بدل ما يروح الايميل على الايميل اللي في ال
From
بيروح على ال
Reply-to
اللي فيه حرف بسيط متغير اليوزر غالبا مش بياخد باله منه ، ده مش حاجة معقدة لانه ده دور ال
Reply-to
انه بتقول انه الايميل ده جاي من ايميل ، بس الرد يروح لايميل تاني ، بتلاقي الكلام ده كتير اوي في الكساتمر سبورت و الكول سنتر
يبتدي بقا النقاش يتم على الايميل الجديد و الراجل مش واخد باله من حاجة و يجيله التأكيد و كله في السليم و الفلوس تتحول و كل سنة و انت طيب
هل الموضوع ده مؤثر ، فشخ ، و اكتر من شركة اعرفها تم النصب عليها بالشكل ده في ملايين….
طب و الحل يا مرسي ؟!
الموضوع ده معقد اوي لانه ال
Reply to
من ضمن الحاجات التقليدية و الستاندارد بتاعت الايميل هيدرز ، يعني منقدرش نقول انه اي ايميل فيه
Reply-to
يبقا سبام ، مش صح ، ففي عامل مهم جدا على اليوزر ، اضف انه لازم تعمل بروتكشن محترم بيعمل
Anti Spoof
و ان كان الانتي سبوف كان شغال في الحالات دي كلها و مقدرشي يمسكها
مراجع:
Configuring Azure Multifactor Authentication with Exchange 2013 SP1
Thanks to Raymond Emile from Microsoft COX, the guy responded to me instantly and hinted me around the OWA + basic Auth, Thanks a lot Ray…
In case you missed it, Azure has a very cool new feature called Azure multifactor authentication, using MFA in Azure you can perform multifactor for Azure apps and for on-premise apps as well.
In this blog, we will see how to configure Azure Cloud MFA with Exchange 2013 SP1 on premise, this will be a long blog with multiple steps done at multiple levels, so I suggest to you to pay a very close attention to the details because it will be tricky to troubleshoot the config later.
here are the highlevel steps:
- Configure Azure AD
- Configure Directory Sync.
- Configure multifactor Authentication Providers.
- Install/Configure MFA Agent on the Exchange server.
- Configure OWA to use basic authentication.
- Sync Users into MFA agent.
- Configure users from the desired login type.
- Enroll users and test the config.
so let us RNR:
Setting up Azure AD/MFA:
Setting up Azure AD/MFA is done by visiting https://manage.windowsazure.com , here you have 2 options (I will list them because I had them both and it took me a while to figure it out):
- If you have never tried azure, you can sign up for a new account and start the configuration.
- If you have Office 365 enterprise subscription, then you will get Azure AD configured, so you can sign in into Azure using the same account in Office 365 and you will find Azure AD configured for you (I had this option so I had to remove SSO from the previous account and setting it up again).
Once you login to the portal, you can setup Azure AD by clicking add:

Since I had Office 365 subscription, It was already configured, so if you click on the directory, you can find list of domains configured in this directory:

If you will add a new domain, click on add and add the desired domain, you will need to verify the domain by adding TXT or MX record to prove you domain ownership, once done you will find the domain verified and you can configure it, the following screenshots illustrates the verification process:


Once done, go to Directory Integration and choose to activate directory integration:

One enabled, download the dirsync tool on a computer joined to the domain:

Once installed, you will run through the configuration wizard which will ask you about the azure account and the domain admin account to configure the AD Sync:


Once done, you can check the users tab in Azure AD to make sure that users are sync’d to Azure successfully:

If you select a user, you can choose to Manage Multifactor Authentication

you will be prompt to add a multifactor authentication provider, the provider essentially controls the licensing terms for each directory because you have per user or per authentication payment, once selected you can click on manage to manage it:

Once you click manage, you will be taken to the phonefactor website to download the MFA agent:

click on downloads to download the MFA agent, you will install this agent on:
- A server that will act as MFA agent and provides RADIUS or windows authentication from other clients or
- Install the agent on the Exchange server that will do the authentication (frontend servers).
Since we will use Exchange, you will need to install this agent on the Exchange server, once install you will need to activate the server using the email and password you acquired from the portal:

Once the agent installed, it is time to configure the MFA Agent.
Note: the auto configuration wizard won’t work, so skip it and proceed with manual config.
Another note: FBA with OWA won’t work, also auto detection won’t work, so don’t waste your time.
Configuring the MFA Agent:
I need to stress on how important to follow the below steps and making sure you edit the configuration as mentioned or you will spend hours trying to troubleshoot the errors using useless error codes and logs, the logging still poor in my opinion and doesn’t provide much information for debugging.
the first step is to make sure the you have correct name space and ssl certificate in place, typically you will need users to access the portal using specific FQDN, since this FQDN will point to the Exchange server so you will need to publish the following:
- Extra directories for MFA portal, SDK and mobile app.
- or Add a new DNS record and DNS name to the ssl certificate and publish it.
In my case, I chose to use a single name for Exchange and MFA apps, I chose https://mfa.arabcloud.tv, MFA is just a name so it could be OWA, mail or anything.
SSL certificate plays a very important role, this is because the portal and mobile app speaks to SDK over SSL (you will see that later) so you will need to make sure that correct certificate in place as well as DNS records because the DNS record must be resolvable internally.
once the certificate/DNS issue is sorted, you can proceed with the install, first you will install the user portal, users will use this portal to enrol as well as configuring their MFA settings.
From the agent console, choose to install user portal:

It is very important to choose the virtual directory carefully, I highly recommend changing the default names because they are very long, in my case I chose using MFAPORTAL as a virtual directory.


once installed, go the user portal URL and enter the URL (carefully as there is no auto detection or validation method), and make sure to enable the required options in the portal (I highly recommend enabling phone call and mobile app only unless you are in US/EU country then you can enable text messages auth as well, it didn’t work with me because the local provider in Qatar didn’t send the reply correctly).

Once done, Proceed with SDK installation, again, I highly recommend changing the name, I chose MFASDK


Once installed, you are ready to proceed with the third step, installing the mobile app portal, to do this browse to the MFA agent installation directory, and click on the mobile app installation, also choose a short name, I chose MFAMobile


Once Installed, you will have to do some manual configuration in the web.config files for the portal and the mobile app.
You will have to specify SDK authentication account and SDK service URL, this configuration is a MUST and not optional.
to do so, first make sure to create a service account, the best way to do it is to fire you active directory users and computers management console, find PFUP_MFAEXCHANGE account and clone it.
Once cloned, open c:\intepub\wwwroot\<MFAportal Directory> and <MFA Mobile App Directory> and edit their web.config files as following:
For MFA portal:


For MFA mobile App:


Once done, you will need to configure the MFA agent to do authentication for IIS.
Configure MFA to do authentication from IIS:
To configure MFA agent to kick for OWA, you will need to configure OWA to do basic authentication, I searched on how to do FBA with MFA, but I didn’t find any clues (if you have let me know).
Once you configured OWA/ECP virtual directories to do basic authentication, go to the MFA agent , from there go to IIS Authentication , HTTP tab, and add the OWA URL:

Go to Native Module tab, and select the virtual directories where you want MFA agent to do MFA authentication (make sure to configure it on the front end virtual directories only):

Once done….you still have one final step which is importing and enrolling users…
to import users, go to users, select import and import them from the local AD, you can configure the sync to run periodically:

Once imported, you will see your users, you can configure your users with the required properties and settings to do specific MFA type, for example to enable phone call MFA, you will need to have the users with the proper phone and extension ( if necessary):

You can also configure a user to do phone app auth:

Once all set, finally, you can enrol users.
Users can enrol by visiting the user portal URL and signing with their username/password, once signed they will be taken to the enrolment process.
for phone call MFA, they will receive a call asking for their initial PIN created during their configuration in MFA, once entered correctly, they will be prompted to enter a new one, once validated the call will end.
in subsequent logins, they will receive a call asking them to enter their PIN, once validated successfully, the login will be successful and they will be taken into their mailbox.
in mobile app, which will see here, they will need to install a mobile app on their phones, once they login they can scan the QR code or enter the URL/Code in the app:


Once validated in the app, you will see a screen similar to this:

Next time when you attempt to login to OWA, the application will ask you to validate the login:

Once authentication is successful, you will see:

and you will be taken to OWA.
Final notes:
again, this is the first look, I think there are more to do, like RADIUS and Windows authentication which is very interesting, also we can configure FBA by publishing OWA via a firewall or a proxy that does RADIUS authentication + FBA which will work.
I hope that this guide was helpful for you.
a Slick Way to to bypass Terminal Services Remote Apps/ Citrix XenApp to gain access to command line from Internet Explorer
Today, a friend of mine who works in our security team, shared with me a slick way to bypass published applications (in our case IE) to gain command line and PowerShell access.
Although users will have access based on his permissions; so if he is a user he won’t be able to do much, yet , in my opinion it bypasses the hall point of Remote Apps/ Citrix XenApp and gives the user access to execution capabilities on the server, if he is a knowledgeable enough, he will be able to compromise the server.
Setup:
XenApp 6.5 Server on Windows Server 2008 R2 with all patches installed, Only IE published.
How to:
Since IE is published only, we assume that user has no execution capabilities on the server, to gain access to PowerShell or command line, do the following:
- From IE open help.
- Within help, search for notepad.
- click on How I can How can I use my devices and resources in a Remote Desktop session?
- Scroll down and click open notepad


- once note pad opened (note that we have access to another application now), type in the file PowerShell and save the file as filename.bat.
- once you saved the file, from Internet Explorer choose, file, Open and open the saved file and voilaaaa, you have powershell and cmd access.
although we can discuss for years if this is a security issue or not, I believe it is for some organizations and it sheds some light on a area where people can bypass a specific published application and gain execution mechanism on servers, Any thoughts ?!
Linked In
the New Experts-Exchange.com
Share This Blog
Recent Visitors Traffic

